
I am a Cupcake Ninja! Well, that's the name of my imaginary bakery at least. The imaginary bakery I will never own because cupcakes truly are just a hobby, not a passion. Although I do seem to have a passion for eating them.... However, to make these ridiculously easy Halloween cupcakes, you don't need mad baking skills or an insane amount of time. I volunteered to make cupcakes for my son's fall festival and I wanted to make some fun and unique cupcakes but I did not want to spend a lot of time and effort because after all, these are preschoolers wer're talking about. They wouldn't appreciate my infamous Pink Champagne, Red Velvet, or Key Lime Pie cupcakes. So I spent some time on Google and looked at hundreds of pictures of cupcakes. I picked out these four designs because they seemed to have the best results with the least effort. And because these are kids pallets we are talking about, these are all done with box cake and canned forsting. Call me lazy, I don't care. But after seeing these cupcakes my four year old said I was "the bestest cupcake making mom ever"! None of theses cupcakes are my original idea. Just my interpretation and copy of ones I have seen. So keep on reading if you want to be that mom (or dad) that all the other mom's are jealous of because your cupcakes are so much better!
Worms in Dirt Cupcake

What you need:
- Box of chocolate cake/Devils's Food Cake mix and ingredients listed on the box
- Cupcake liners (dark color works best)
- Chocolate frosting
- Chocolate cookies or graham crackers
- Gummy worms
Bake boxed chocolate cake or Devils's Food cake as cupcakes as directed on the box. (Or of course you can make your own homemade recipe.)
While the cupcakes are baking (or you can do it in advance), you need to make "dirt". To make the dirt, you will need to crush up some sort of chocolate cookie. Most people crush up Oreo's, however I would have been forced to eat the cream out of the middle of each cookie so I used Nabisco's Chocolate Wafers. I was initially going to use chocolate graham crackers but the store I was in didn't have any. Place the crushed up cookies in a bowl.


Here is how to use the grass tip (from the Wilton website):
Once the cupcakes have cooled, use an angled spatula to spread your choice of chocolate frosting over the top and exposed sides of the cupcake. I would suggest not using a "whipped" kind of frosting because it could lose its shape for the next step. (I learned this lesson on the Pumpkin cupcake). I also say an angled spatula because they are by far the easiest thing to use to frost a cupcake. If you don't have one, go buy one.
I would suggest putting the dirt on each cupcake as soon as you frost it in order for the dirt to stick better. Place your cupcake lightly on its side in the bowl and roll it in the dirt. Make sure to shake the bowl some if you can see the bottom of the bowl through the cookie crumbles. Then lightly roll the top all around in the dirt. There may be places that the dirt didn't stick, so just sprinkle some over the bare spots and lightly pat it down. If your cupcake starts to lose its shape from the rolling, you can easily just pat it back into the desired shape.
Finally, you can use whatever kind of worm like candy you want. I chose the sour gummy worms because of their bright color. You can arrange them whatever way you would like, however I chose to stick them down in the cupcake for transportation purposes so the worms would not be falling off while driving down the road. I used the end of a ball point pen (not the tip!) to poke short holes into the cupcake and the worms fit perfectly into the hole.
Spider Cupcake

What you need:
- Box of chocolate cake/Devils Food Cake mix and ingredients listed on the box
- Cupcake liners (dark color looks best)
- Chocolate frosting
- Large container of chocolate sprinkles. (I think black sanding sugar would look good too!)
- Black licorice rope
- Cinnamon Imperial Candies
Bake boxed chocolate cake or Devils's Food cake as cupcakes as directed on the box. (Or of course you can make your own homemade recipe.)
Once the cupcakes have cooled, use an angled spatula to spread your choice of chocolate frosting over the top and exposed sides of the cupcake. I would suggest not using a "whipped" kind of frosting because it could lose its shape for the next step.
Pour the chocolate sprinkles in a bowl. Place your cupcake lightly on its side in the bowl and roll it in the sprinkles. Make sure to shake the bowl some if you can see the bottom of the bowl through the sprinkles. Then lightly roll the top all around in the sprinkles. There may be places that the sprinkles didn't stick, so just drop some over the bare spots and lightly pat it down. If your cupcake starts to lose its shape from the rolling, you can easily just pat it back into the desired shape.
Place two cinnamon imperials in the place of eyes.
Cut the licorice rope into whatever length you want and stick them into the cupcake. To get the spider leg look, I suggest sticking the licorice just above the cupcake liner/bottom of the muffin top. If you are using a regular cupcake carrier, you may have to place the legs when you get to your destination. Unless your spider has short stubby legs, they won't all fit in the carrier. Also, don't forget a spider has 8 legs!!! I saw a lot of spider cupcakes online that did not have the correct number of legs.
Pumpkin Cupcakes
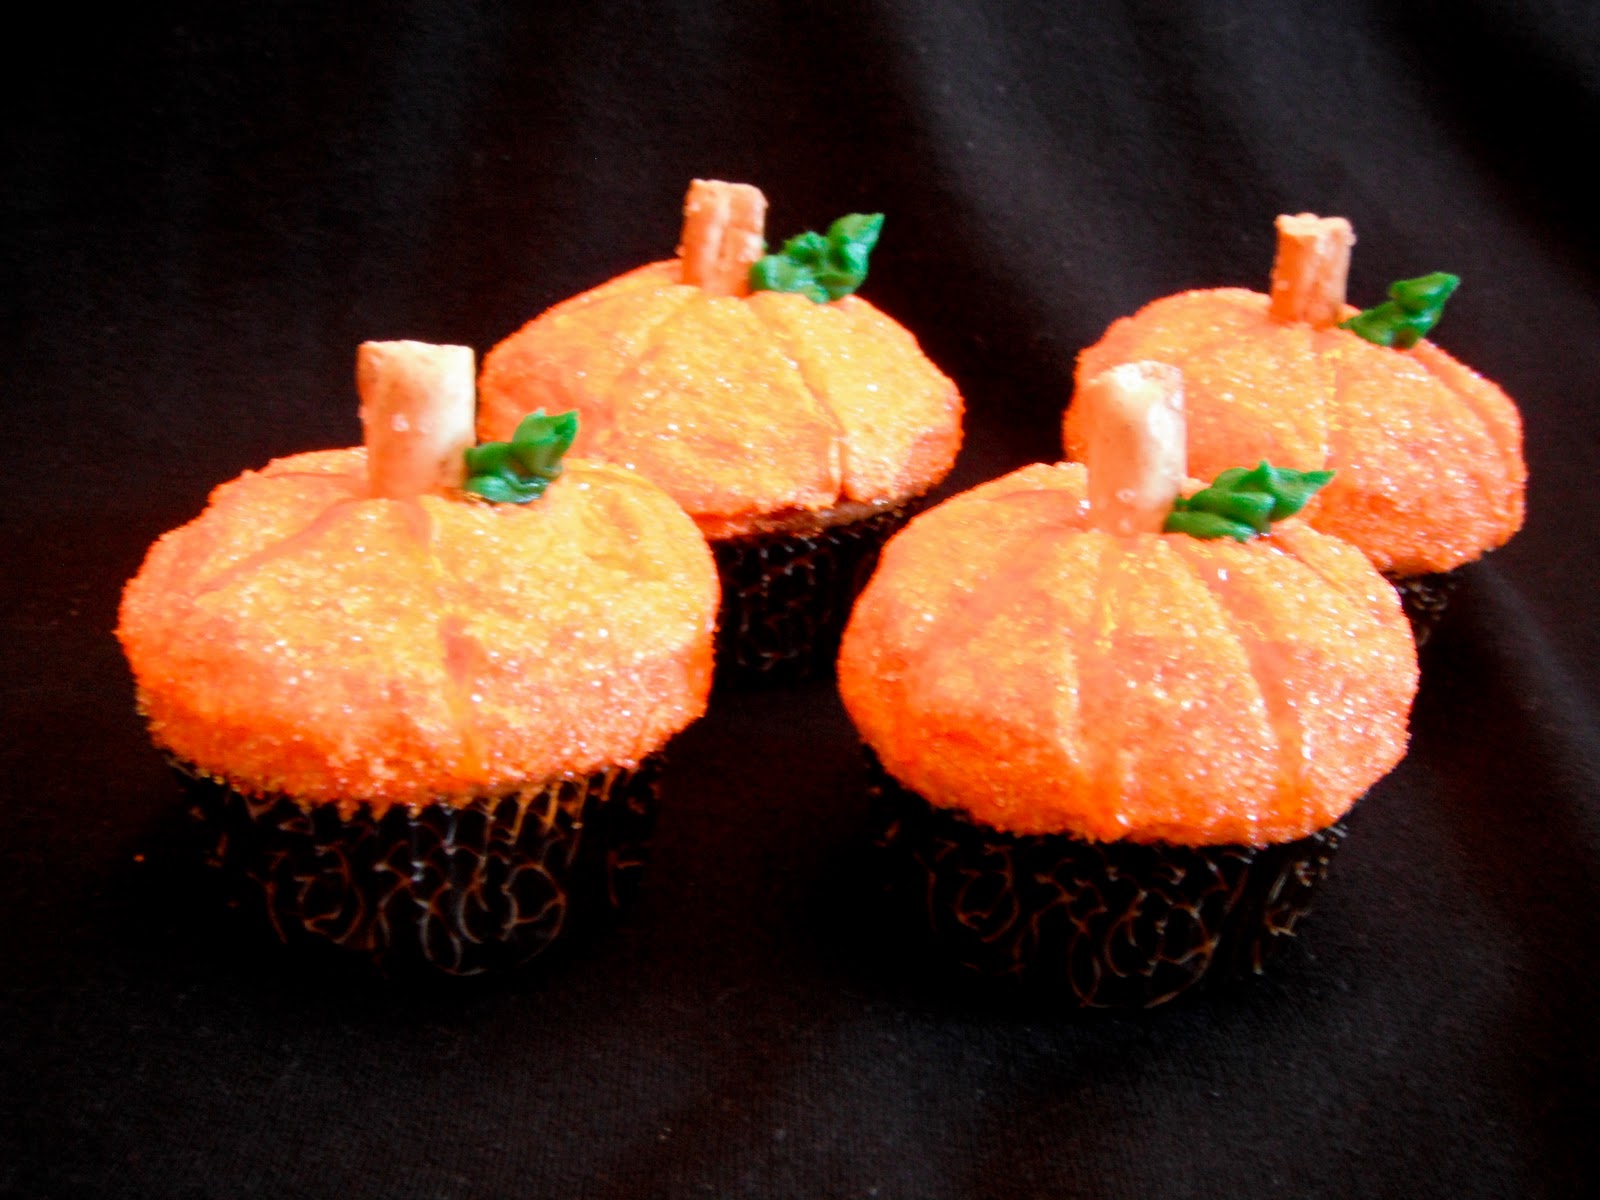
What you need:
- Any flavor of boxed cake mix. (I used yellow cake)
- Any white/light color of canned frosting or orange frosting if you can find it. (I used cream cheese)
- Orange frosting paste or orange food coloring (I prefer and recommend the paste when coloring icing and you can find it in any craft store such as AC Moore/Michael's.)
- Orange sanding sugar or sprinkles
- Tube of green icing with a leaf tip (optional)
- Twisted stick pretzels (I used Snyders Honey Wheat Sticks)
- Cupcake liners
- Tooth pick or skewer
- Piping bag with a small round tip, or a plastic quart size bag.
Bake boxed cake mix as cupcakes as directed on the box. Of course you can make your own homemade recipe. I think a pumpkin spice cake would be perfect for these cupcakes! Of course my kid won't touch pumpkin anything. Little does he know what's missing!
While the cupcakes are cooling, mix the orange coloring paste and frosting together. You do not need a lot of the paste to get a vibrant color. Add a small amount at a time until you get the desired color.
Once the cupcakes have cooled, use an angled spatula to spread the frosting on the top and exposed sides of the cupcake. When you start to frost, make sure you use a large dollop on top to give it the rounded shape of a pumpkin. I would suggest not using a "whipped" kind of frosting because it will lose its shape when doing the next step.
Pour the orange sanding sugar into a bowl. Place your cupcake lightly on its side in the bowl and roll it in the sprinkles. Make sure to shake the bowl some if you can see the bottom of the bowl through the sprinkles. Then lightly roll the top all around in the sprinkles. You need to try and roll the cupcake as lightly as you can in order to keep the shape. There may be places that the sprinkles didn't stick, so just sprinkle some over the bare spots it and very lightly pat it down. If your cupcake starts to lose its shape from the rolling, use the spatula to lightly pat it back into shape.
Using a tooth pick or wooden skewer, starting from the top, roll the tooth pick/skewer down to make indentions in the frosting like those on a pumpkin.
On this next step I used the little tube of orange colored gel found on the baking isle. I suggest not doing this because it looks kind of weird. Instead, place some of the orange frosting either in a piping bag or a plastic quart sized bag with the tip cut off one of the corners. Pipe thin lines of icing down each of the indentation on the cupcake.
Cut or break the pretzels into bite size pieces and push down into the top to make the pumpkins stem.
I decided the cupcake needed something extra, so using the premade tube of green frosting, I added leaves using the leaf tip. (Can be inexpensively bought at any grocery store in the baking isle.)
Monster Face Cupcakes

What you will need:
- Any flavor of boxed cake mix. (I used yellow cake)
- Any white/light color of canned frosting. You will probably need two if you're making a more than a dozen. (I used vanilla)
- Any color of food coloring/coloring paste
- Different candy, icing, gels, etc for decorating.
- Cupcake liners
- Piping bag with a grass tip (#233)
Bake boxed cake mix as cupcakes as directed on the box.
While the cupcakes are cooling, mix whatever colors you decide to do with the frosting. You do not need a lot of the paste to get a vibrant color. Add a small amount at a time until you get the desired color.
Once the cupcakes are cool, frost the cupcakes using the grass tip (#233). If you've never used a grass tip, it is ridiculously easy. These cupcakes were the first time I've ever used one! (So ignore the monster in the back right corner, he got dropped.)
Once you have the cupcakes frosted, make whatever kind of faces you want with whatever kind of decorating elements you have on hand. Have fun with it and let your kids help!
- Fit the piping bag with grass tip # 233 and fill 1/2 full with medium consistency icing. Hold the decorating bag 90° straight up; the tip should be 1/8 in. above surface.
- Squeeze bag to form grass. Pull up and away when icing strand is long enough (about 1/2 inch) stop pressure and pull tip away. Grass will be neatly formed only if you stop squeezing before you pull tip away.
- For a more natural look sometimes pull tip slightly to the right or left, in stead of straight up. Remember to keep clusters close together so cake does not show through.
2 comments:
Will you be my Mommy too?
Will you be my Mom? Please?
Post a Comment